With the rising demand for organic food and sustainable farming practices, vermicompost has become one of the most profitable and eco-friendly agricultural businesses worldwide. If you are wondering how to start a vermicompost business step by step, this complete guide will walk you through everything from initial setup and worm selection to production, packaging, and marketing.
Today, farmers, plant nurseries, landscapers, and home gardeners are actively searching for high-quality organic fertilizers to improve soil health and crop productivity. This growing demand creates an excellent business opportunity for beginners and experienced entrepreneurs alike. Whether you want to start small from your backyard or scale up to commercial production, learning how to start a vermicompost business step by step can help you build a steady income while promoting environmental sustainability and reducing organic waste naturally.
Table of Contents
Step 1 – Understand the Vermicompost Business Model
Before investing money or setting up a unit, it is important to clearly understand the business structure. If you truly want to learn how to start a vermicompost business step by step, the first thing you need to know is how this business actually works and how it generates profit.
Vermicomposting is the process of converting organic waste into nutrient-rich compost using earthworms. The worms consume biodegradable materials such as vegetable waste, crop residues, and animal manure, and convert them into high-quality organic fertilizer known as vermicompost. This finished product is widely used in farming, gardening, landscaping, and nurseries because it improves soil fertility, enhances plant growth, and increases water retention capacity.
The business model is simple: collect low-cost or free organic waste, process it through vermicomposting, and sell the finished compost at a higher market price. Since raw materials are inexpensive and demand for organic fertilizer is steadily increasing, profit margins can be attractive even at a small scale. You can start as a home-based producer and gradually expand into bulk supply for farms, garden centers, or retail packaging.
Understanding this production-to-sale cycle will help you plan your investment, pricing strategy, and long-term growth effectively.
Step 2 – Conduct Market Research
After understanding the business model, the next crucial step in learning how to start a vermicompost business step by step is conducting proper market research. Even though vermicompost has a strong demand, success depends on knowing your local market conditions and customer needs.
Start by identifying your target customers. These may include farmers, plant nurseries, garden centers, landscaping companies, organic food growers, and home gardeners. Find out who is already buying organic fertilizers and how much they are willing to pay. This will help you estimate potential demand in your area.
Next, study your competitors. Are there other vermicompost producers nearby? What is their pricing, packaging style, and product quality? Understanding the competition allows you to position your product better—either by offering improved quality, competitive pricing, bulk discounts, or better packaging.
Proper market research reduces risk and ensures that when you start production, you already have a clear idea of where and how you will sell your vermicompost.
Step 3 – Choose the Right Location and Setup Type
Choosing the right location is a critical part of learning how to start a vermicompost business step by step, because the success of your production largely depends on environmental conditions and proper infrastructure. Vermicomposting requires a shaded, cool, and well-ventilated area where temperature and moisture can be controlled easily.
First, decide how much space you need based on your scale of operation. A small home-based setup can start in a backyard, garage corner, shed, or even on a terrace using bins or containers. Medium- and large-scale units require more open land with proper drainage and access to water.
You must ensure the location is protected from direct sunlight and heavy rain, as extreme heat or excess water can harm the earthworms. A simple shed with a roof and good airflow works well for most setups. The area should also have a regular water supply to maintain moisture levels, which are essential for worm activity.
Proper drainage is equally important to prevent waterlogging. Selecting the right location and setup type at the beginning reduces maintenance problems and improves compost quality and production efficiency in the long run.
Step 4 – Select Raw Materials and Earthworms
Selecting the right raw materials and earthworms is a crucial stage in learning how to start a vermicompost business step by step, because the quality of your inputs directly affects the quality of your final compost. Good raw materials ensure faster decomposition, healthy worm growth, and higher nutrient value in the finished product.
The primary raw materials for vermicomposting include biodegradable organic waste such as vegetable and fruit scraps, crop residues, dry leaves, grass clippings, and agricultural waste. Animal manure—especially well-decomposed cow or livestock manure—is commonly used because it provides essential nutrients and supports worm activity. However, fresh manure or freshly collected waste should never be used directly; it must be partially decomposed first to reduce heat and harmful gases.
Bedding materials are also important. Materials like shredded newspaper, coconut coir, straw, or dry leaves create a comfortable environment for the worms by maintaining moisture and airflow.
Choosing the right earthworm species is equally important. Popular composting worms include Eisenia fetida (Red Wigglers), Eudrilus eugeniae (African Nightcrawler), and Perionyx excavatus. These species reproduce quickly and efficiently break down organic matter. For beginners, starting with a moderate quantity of healthy worms ensures steady compost production without overinvestment.
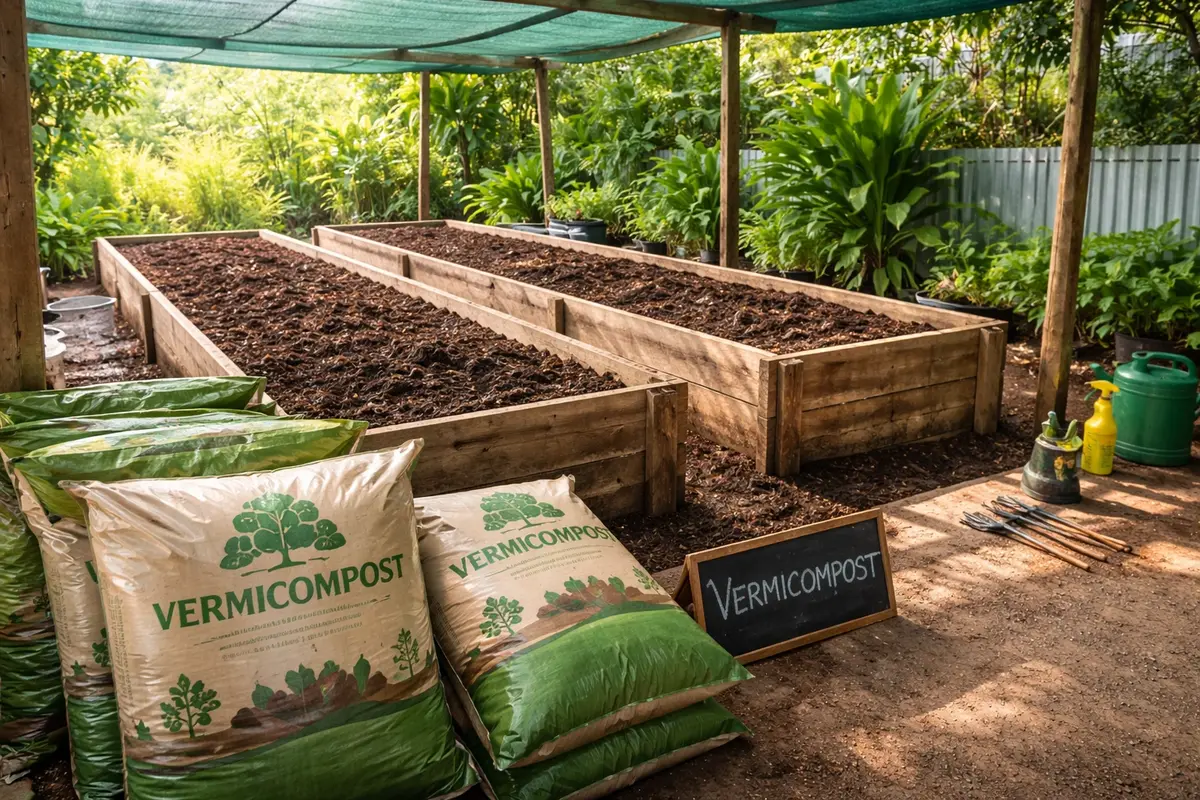
Step 5 – Setting Up the Vermicompost Unit
Once you have selected the raw materials and earthworms, the next step in understanding how to start a vermicompost business step by step is setting up your production unit properly. A well-designed setup ensures better compost quality, easier maintenance, and higher productivity.
There are several methods you can choose from depending on your budget and available space. The pit method involves digging shallow pits in the ground and filling them with bedding and organic waste. This method is low-cost but requires good drainage to prevent water accumulation. The tank method uses cemented or brick tanks built above ground level, offering better durability and protection.
For beginners and small-scale producers, the bed method is very popular. In this setup, organic materials are arranged in long rectangular beds under a shaded structure. It allows easy monitoring and harvesting. The container or bin method is ideal for home-based businesses, where plastic or wooden bins are used for controlled composting in smaller quantities.
Your setup should include proper shade, ventilation, drainage, and access to water. Investing time in building the unit correctly at the beginning helps avoid future operational problems and improves overall efficiency.
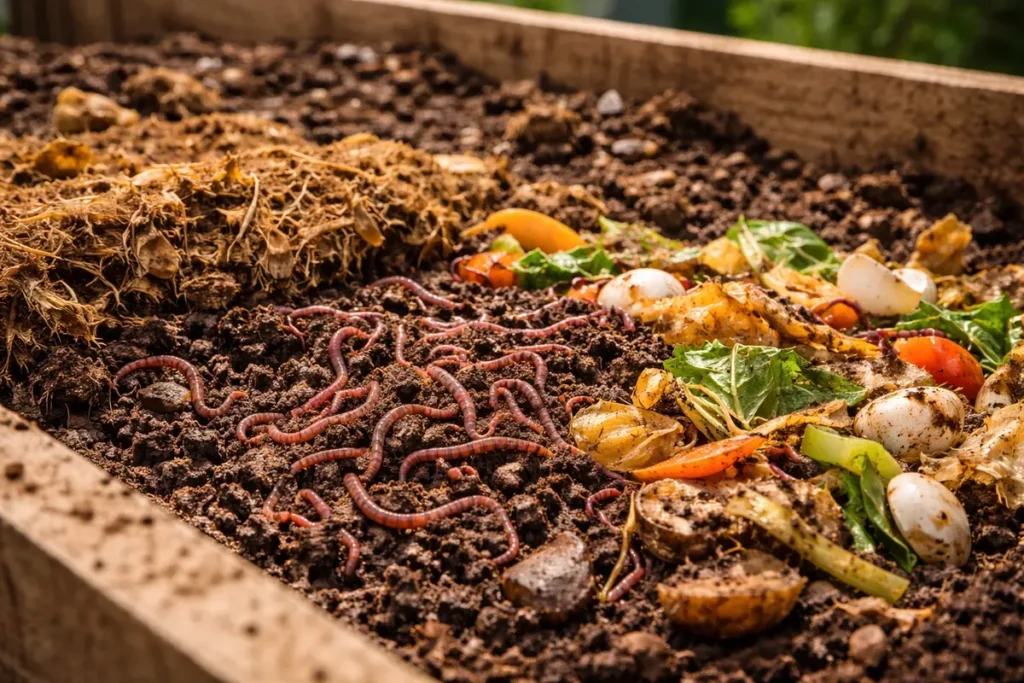
Step 6 – Vermicomposting Process Step by Step

Now comes the most important part of learning how to start a vermicompost business step by step—the actual vermicomposting process. Proper execution at this stage determines the quality, quantity, and profitability of your compost production.
First, prepare the base layer in your pit, bed, tank, or container. Add a layer of bedding material such as dry leaves, straw, coconut coir, or shredded paper. This layer improves aeration and helps maintain moisture. On top of the bedding, add partially decomposed organic waste mixed with well-rotted manure. The material should not be fresh, as fresh waste generates heat that can harm earthworms.
Once the material cools down, introduce the earthworms evenly across the surface. Cover the setup with a moist gunny bag, cloth, or straw to maintain darkness and humidity. Earthworms thrive in moist conditions, so maintain moisture levels around 60–70% by sprinkling water regularly. Avoid overwatering, as waterlogging can reduce oxygen levels and slow down the process.
The ideal temperature range for vermicomposting is between 15°C and 30°C. Under proper conditions, worms actively break down organic matter, and compost is usually ready within 45–60 days. Regular monitoring ensures healthy worm activity and consistent compost production.
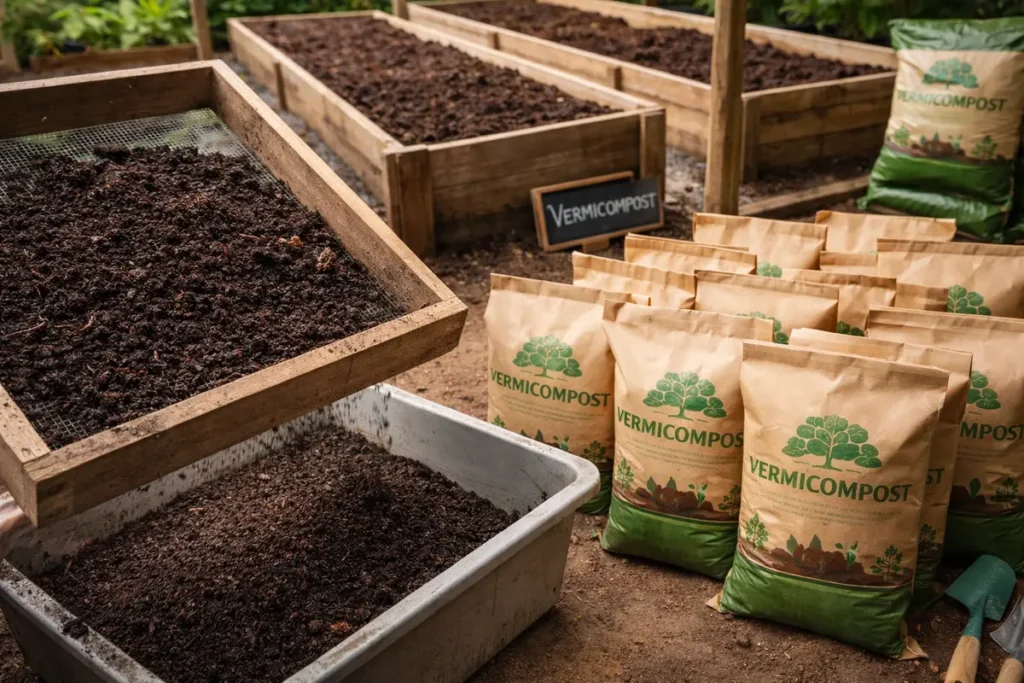
Step 7 – Harvesting, Processing, and Packaging
After 45–60 days, the composting cycle is usually complete, and it’s time to harvest your product. Understanding this stage is essential when learning how to start a vermicompost business step by step, because proper harvesting and packaging directly affect product quality and customer satisfaction.
You will know the vermicompost is ready when the material turns dark brown or black, has a fine, crumbly texture, and gives off an earthy smell. At this stage, most of the original waste materials will no longer be visible. Stop watering a few days before harvesting to make separation easier.
Next, separate the earthworms from the finished compost. This can be done manually by heaping the compost under light (worms move downward away from light) or by using a sieve to filter the compost. The separated worms can be reused for the next production cycle, reducing future costs.
After separation, dry the compost slightly under shade to remove excess moisture. Then sieve it to achieve a fine texture. Finally, pack the vermicompost in moisture-resistant bags of different sizes (e.g., 1 kg, 5 kg, 25 kg). Proper labeling and clean packaging increase market value and build trust with customers.
Step 8 – Investment, Cost, and Profit Margin
Understanding the financial aspect is a crucial part of learning how to start a vermicompost business step by step, because profitability depends on managing costs efficiently and selling at the right price.
The initial investment varies depending on the scale of operation. A small home-based setup using bins or simple beds requires minimal spending, mainly for earthworms, bedding materials, containers, and basic infrastructure like shade and water supply. Medium- or commercial-scale units require additional investment for building tanks or beds, installing proper drainage systems, purchasing larger quantities of worms, and arranging bulk raw materials.
Monthly operating expenses usually include labor (if hired), water, transportation, packaging materials, and raw material collection. Since many organic waste materials are low-cost or free, production expenses can remain relatively manageable.
The profit margin depends on production capacity and market price. Vermicompost is generally sold per kilogram or in bulk. With proper quality control and consistent demand, small-scale producers can achieve steady returns. As production increases and the customer base expands, profit potential grows significantly due to relatively low recurring costs and reusable earthworms.
Step 9 – Marketing and Selling Your Vermicompost
Marketing is a key factor in successfully implementing how to start a vermicompost business step by step, because production alone does not guarantee profit. You must have a clear sales strategy to reach the right customers and build consistent demand.
Start by identifying your primary buyers. Farmers, plant nurseries, garden centers, landscaping companies, and home gardeners are the most common customers for vermicompost. You can approach them directly, offer free samples, and explain the benefits of your product, such as improved soil fertility, better plant growth, and chemical-free nutrition.
Local networking is very effective. Participate in agricultural fairs, farmers’ markets, gardening events, or community programs to promote your brand. Word-of-mouth marketing works especially well in the agriculture sector when customers see visible results.
Online marketing can also increase your reach. Create social media pages, share before-and-after plant growth results, and post educational content about organic farming. If possible, list your product on local e-commerce platforms or your own website.
Building long-term relationships with repeat customers ensures stable income and helps your vermicompost business grow steadily over time.
Step 10 – Common Mistakes to Avoid
Even after learning how to start a vermicompost business step by step, many beginners make simple mistakes that reduce compost quality and profitability. Avoiding these errors can save time, money, and effort.
One of the most common mistakes is overwatering. While earthworms need moisture to survive, excessive water causes waterlogging and reduces oxygen levels, which can slow down decomposition and even kill the worms. Always maintain balanced moisture instead of soaking the material.
Another major mistake is using fresh organic waste or fresh manure directly in the unit. Fresh materials generate heat during decomposition, which can harm or kill the worms. Always pre-decompose waste before adding worms.
Poor drainage and exposure to direct sunlight are also common problems. High temperatures and improper airflow negatively affect worm activity. Additionally, choosing the wrong worm species or buying low-quality worms can reduce productivity.
By maintaining proper moisture, temperature, raw material preparation, and worm care, you can ensure consistent production and long-term success in your vermicompost business.
Conclusion: Is Starting a Vermicompost Business Worth It?
Now that you understand how to start a vermicompost business step by step, it’s clear that this is a low-investment, eco-friendly, and scalable business opportunity. With the increasing global demand for organic farming and sustainable soil solutions, vermicompost has become a valuable product for farmers, gardeners, and landscaping professionals.
One of the biggest advantages of this business is its simplicity. It does not require advanced technology or heavy machinery, and it can be started from a small space with basic resources. As your customer base grows, you can easily expand production and even introduce related products such as liquid vermiwash or organic potting mixes.
Beyond profit, this business also contributes to environmental sustainability by recycling organic waste and improving soil health naturally. With proper planning, quality control, and effective marketing, vermicomposting can provide a steady source of income for years to come.